Wednesday, March 30, 2016

Off The Rails - April Challenge

Sharing another mood board with you today from Off The Rails Scrapbooking.. This month it's a beautiful board featuring WATER COLOURS..


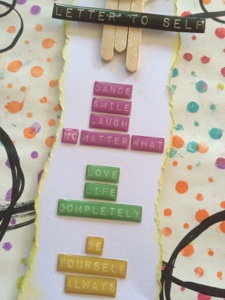
 Pretty Little Things


Now I must admit that this was created a little last minute.. oops!!
As a member of the Memory Maze DT we were asked to join the OTR team this month with some inspirational pieces.. Since life has been so busy, hectic, full etc etc.. I didn't get much opportunity to be super organised like I usually try to be..
 
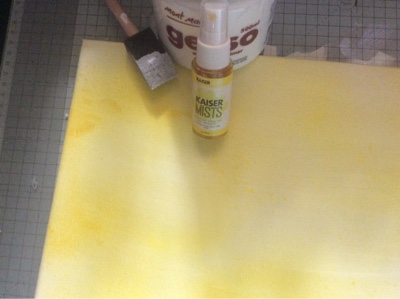
I used only a very simple blending technique with this project..
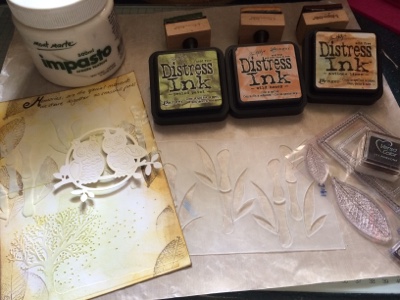
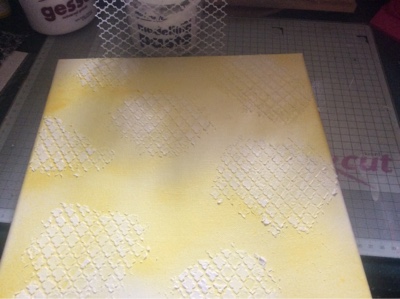
Starting off by applying some clear Impasto with the Memory Maze chipboard piece as a mask, then scribbling on some water colour pencils and adding the water brush..
 
 
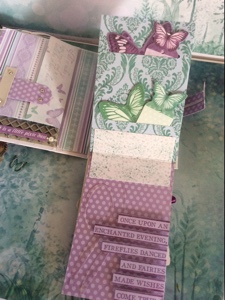
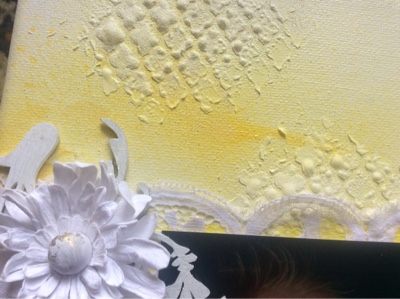
Here is another photo mid project.. I decided to add some more hearts and used the chipboard piece as a stencil this time.. The black hearts are made with the Black water colour pencil..
 
 
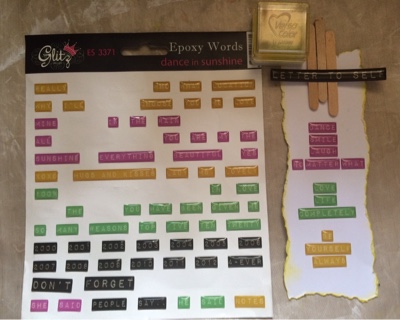
All of the goodies I got to play with for this project--
 
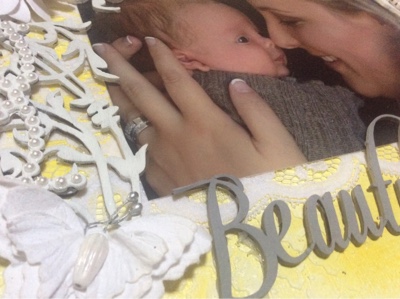
The stamped sentiments were a set from Kaiser and added with the Black StazOn..
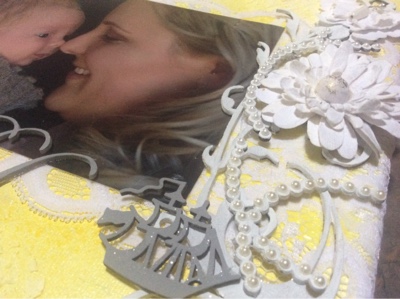
The Memory Maze chipboard Butterflies were coloured with a silver "Pewter" H2O, which I then added around the edges of the Art Journal and even between where the colours join.. Lastly,  a light random coat of both a clear Smooch Shimmer mist and the clear glass Goosebumps texture spray..


Thanks for stopping by today! Don't forget to get your own entries linked up to the Off The Rails Scrapbooking challenge blog by the end of the month to be in the running for awesome prizes from Memory Maze..
 
If you haven't already, please do make sure you drop by my crafting Facebook page to be kept up to date with all my latest creations!! And while you're these, check out the Off The Rails page too! Toni..
 

Off The Rails - March challenge

Welcome back craft bloggers.
Today I'm bringing you a really lovely and relaxing piece that I have created using inspiration from the Off The Rails Scrapbooking mood board for this month..
 
 
As soon as I saw the board I thought of my Mum, but unfortunately I didn't have the right photo on hand.. I do know what photo I want to slot on here, it's one of her on a NZ Cruise.. a 5"x7" photo can be placed where the white piece of paper is..


I started out by applying white Gesso to the base of this canvas then lightly spraying with a Black mist, Green mist and Blue mist..
(I actually had quite a bit of crafting issues with this process.. Everything was going to plan until I put some old Crackle paint on the top half.. It didn't look right, didn't crackle right and had an odd egg shell colour.. ehh.. So I peeled off all the crackle paint once it was dry then recovered everything with the White Gesso and started again!)
 
 
Then once it was all dry again, it was a simple matter of adhering all of the embellishments on..
 
 
As you can see I stuck to the colours for the mood board quite well..
I didn't add the word "relax" as I haven't given this a title, however I did use the mirror on the left side as the word relax in the mood board looks to be a mirror..
 
 
I included feathers for the bird, butterflies and the water / pebbles look inspired the misted background and the beautiful Prima gate pieces..
 To finish off there are plenty of flowers and the stunning bling piece on top of the black flower helps to tie in the mirror too!


Would love for you to drop by the Off The Rails Scrapbooking blog or facebook page and maybe play along when you get the chance.. They have a new challenge starting soon!! :)


Tuesday, March 22, 2016

Fairy Pocket Album - video

Fairy Pocket Album


Welcome back..  Today I would like to share with you another awesome creation using the Kaiser - Fairy Dust collection and some gorgeous Memory Maze chipboard pieces..
I have included some photos below, but for more information please check out my video  ---  HERE  


The piece of chipboard on the front is actually a 12x3 1/2 inch piece, so there is enough to flow through to the inside also..


The frames and Clock are leftovers from other projects.. I keep them in a grab bag, so they are handy for quick access..


Here is a quick pic of what my desk looked like MID-project.. lol..


TIP: WHEN PUTTING A BRAD INTO CHIPBOARD, FIRST PIERCE IT WITH AN EYELET HOLE MAKER..


Thursday, March 10, 2016

Scrapbook Fantasies - week 9

Welcome back for the second Art Journal page that I managed to get completed yesterday.. I sat down at my crafting desk with one particular project in mind.. I didn't actually get around to doing that project, but I did at least get the AJ pages done instead.. haha... :)
This one was done for entry into the Scrapbook Fantasies blog for their week 9 challenge..
CIRCLES
 
weekly-inspiration-challenge-9-2016
 

Letter to self

 
Just like all my art journal pages, this one started out by being ripped out of the book (to be glued in again on top of the next page) and side trimmed down.. Thankfully I did this, as this one started all kinds of wrong! lol.. Some unfixable mistakes were made and it very quickly went into the bin.. Gladly now though, I am able to show you my second attempt at this challenge and admit that this one totally blows my mind! It has come up so much better than I had first imagined! YAY me! lol..
 

Step One: Coat base with white gesso, then I used a Kaiser stencil and some mini ink pads to create the funky circle / dots..
 

Next was to create some more circles. I wanted these to really pop off the page, so chose to go with a solid thick black marker.. I used a cd, double sided tape and another stencil as guides to trace the circles..


I really wanted to make a nice and simple tag to add my journaling stickers too. So I tore along the edges and inked the sides.. I wanted a clean base so the words didn't have to fight amongst the other designs to be seen.. 

 
I attached it to the page with some 3D tape to give some extra dimension.. 
Thank you so much again for joining me today!! I hope you may have some inspiration to get crafty soon and link up your own entry into the Scrapbook Fantasies week 9 challenge!!


Wednesday, March 9, 2016

123 Challenge - March

Today was Art Journal day.. ;) 
In this post I am going to share with you the first page.. This one was created for entry into the 123 Challenge blog..
 The criteria are; Autumn Tones - "Memories" - Leaves


As I do with all of my art journal pages, I start with a page I have torn out of the book.. (I will glue it back in, onto of another page when finished).. I do this so if there are any unfixable mistakes, then I can simply start again without any hassles and it also keeps my book clean of any excess texture paste or stray misting spray.. lol.. 


Step one was to add that fun dry embossed image of the tree with some leaves smoothly blowing off it.. Then for this one I did not coat the base with Gesso like usual, but instead I simply coloured with some Distress Inks with the foam blending tools.. 
The next layer was two different size leaves randomly stamped around the page, mostly on the edges with Pinecone ink.. Using some clear Impasto and a really cute Bamboo stencil from Memory Maze I made a base under the Owls.. 
The die-cut Owls were super lightly wiped over with the Wild Honey distress ink to take the starkness of the solid white from it.. 
Then I journal a little saying that I made up on the top, titled Memories.. :) 


This challenge was so much fun and I bet you'd really enjoying getting some crafting time in soon too for it! The challenge is open all month, so you can link up to the 123 Challenge blog any time during March.. 


Saturday, March 5, 2016

Son-uva Digger layout

Chipboard friends and family, I have a Monster treat for you today with a photo featuring my oldest son Lane with his favourite Monster Jam truck, Son-uva Digger while we were in Brisbane in October.  Lane was stoked that he got to met Adam Anderson (the driver) too!!! Woot Woot!
 

Son-uva Digger


 This base page started out being a basic white Bo-Bunny pattern paper with cogs on it.
I used some Memory Maze goodies with some mixed media supplies to try and make the photo pop!
 I started out by using a chicken wire stamp, place randomly around the edges of the paper. I used a purple StazOn for this.


Then that was followed by cutting the chicken wire into 3 strips and separating the cogs into smaller pieces of clusters.. Then sticking down the chipboard and coating with some white Gesso.
Once it was dry (via the heat gun - thanks to my impatience) I sprayed with A LOT of different mists. *see photo below*
Allowed to dry again before I painted the Silver ink over the top of the Cogs and lightly ran the lighter purple ink pad over the top of the chipboard wire.
 The metal embellishments were put on, along with the Thickers title and journaling tag added.
The final touch was a light spray of a brown over a Memory Maze stencil to mimic some mud splashes in the top corners.

 
Mixed Media supplies used 
 
 
Design Team 2015 July to December
 
Memory Maze products used:


Thursday, March 3, 2016

ArchiScraps March challenge

Welcome back... I'm back with some exciting news from my entry just a few days ago into the ArchiScraps Febuary challenge ---- I WON!  

I was truly shocked and speechless! I certainly wasn't thinking that I would even be in the running to be a winner as I was really only new to the blog and first time entrant with a quick layout.. Although I am very grateful as I did put alot of thought into the details of the layout and tying the building in as much as I could.. I was stoked with the finished layout, so am very happy others liked it too!! 

Anyway, this evening I'm here to share with you this months challenge... It is to use this stunningly beautiful building as inspiration and it requires the use of Gesso / Texture Paste.. 


The my first instint reaction to the inspiration pic was WOW BEAUTIFUL! 
So just knew I had to use a photo that would capture that same reaction and of course title it the same.. I actually Googled for quite a while trying to find some more info on this building, but couldn't find anything!  ** So ArchiScraps DT - if you have info on this building, can you let me know please, I'm intrigued.. :)

Beautiful


The photo is of a friend and her goregous little boy as a baby, about 18months ago.. 

As per my normal crafting process, I tosed around so many ideas and options that just weren't working... Finally a bright spark came to use a canvas and my favourite new Yellow spray mist.. :) 
 

Next was trying to find a stencil that matched the decorative designs on the buliding.. The designs are so beautiful and delicate.. Of course I had plenty of goregous options, however NONE of them were going to work because I really needed a negative of the stencil... Ahhhhh.... First world problems of a crafter!  Anyway, I setteld on this design as it replicates the design under the curve of the building awning thinyg.. Unfortunately the stencil is still the wrong way away though..  Is used a white modelling paste.. 


Even though my process ws tiring at times, I really enjoyed making this project when things were going right! lol.. 😉. 
One such thing came after a few more fails... I lightly coated the top of the modeling paste with gesso and sprinkled with white puff embossing powder.. I loved how the modelling paste actually puffed up.. I know usually we try to not overheat the paste so it doesn't do this, but with this project it added extra texture and is keeping it's puff so well!! Yay!  More texture and dimension the better I believe! lol.. 


 To embellish the canvas I used two different Memory Maze chipboard flourish swirls.. I first coated with gesso then covered with white paint.. I did the same to the two MM pieces that look like dots.. I then put on seperate pearl dots on them to add even more texture, dimension and give an elegance feel.. 


Both the MM pirate ship piece and title piece are simply painted with a grey paint.. The ship has some Glitter sprinkled on it too.. 
Lastly was to add the white flowers and white butterflies.. 


I would love for you to drop by the ArchiScraps challenge blog this month and link up your own creation inspired by this stunning building! Memory Maze are sponsoring with a great chipboard pack!! So get crafty and link up!! Have fun, Toni.. xoxo

Memory Maze products used:
 
beautiful memories 110 x 180mm min buy 3
 
Swirl 1 Swirl flourish  min buy 3
 
Swirl 6a  flourish  min buy 3
 
Fireworks dots