Sunday, January 31, 2016

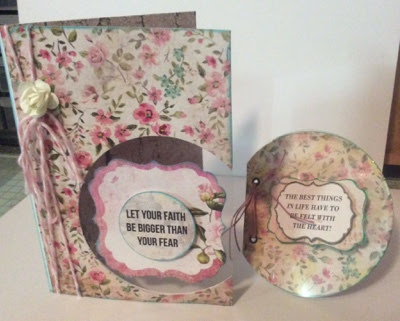
Girl themed Tri-Fold card

I tried to make a Tri Fold card a few years ago and have to be honest, I really didn't like it..
Since then and especially lately I have seen a revival of these cards and so made it a mission to make another and hopefully love it this time.. Thankfully I was successful within my own standards and really like how it has turned out..


Staying with my trend of trying to use up old paper pads, I managed to get three collections into this one card.. Kaiser - Butterfly Kisses & Violet Crush and the Bo Bunny Enchanted Garden ranges..
 
 
I kept the embellishments simple and added only cut out pattern paper, one flower and some twine
 
Perfect for a Pre-Teen girl I think.. BFF to BFF.. What do you think?

 
Thanks for dropping by today.. Come back soon for more of my crafting goodness.. Toni.. xoxo


Friday, January 29, 2016

123 Challenge - January

 
 I'm a bit excited to share with you today a layout that actually turned out WAY BETTER than I had expected.. lol.. It looks pretty amazing IRL.. :)
 
It is my entry into the January challenge over at the 123 Challenge Blog..


This layout was created with one purple cardstock base - it matches the dress I am wearing in the photo..
And one piece of newly released 12x12 Kaiser pattern paper.. I had to do a tiny bit of trimming to all of the squares to make them fit with a small purple frame showing..
 
 
For the texture part of the challenge I have included Gesso, Clear Impasto, Glossy Accents, distressed edges and because "texture" can sometimes be with the eyes not only by touch, I included some faux stitching around each pp block and glitter.. And the final touch for texture was depth - I did this by included the flowers, 3D'd the days of the week, title and the chipboard doily piece..


I used the word part of the challenge quite differently to what others have.. I have used a photo of ONLY myself and made the journaling about MYSELF... -- However, there is a twist ---
 
Me, Myself & I
2016; I am going to grab the HAPPY! I am taking it upon myself to make the year positive! So together, "me, myself & I" are looking forward to a great year ahead!
 
As it mentions in the journaling, I am taking the steps within myself to be positive.. Put out positive vibes and thoughts! I am no longer going to let bad or sad rule my reactions or decisions.. Every day I am going to make a great day! :)

Now back onto the 123 Challenge Blog... I believe they are having a DT call this month.. So if you're a lover of challenges, why not drop on over to the blog, check out the details and then send through an email to Alicia.. Good Luck!
 
Thank you for joining me today, I hope you've found some sort of inspiration from my layout too.. Toni.. xoxo

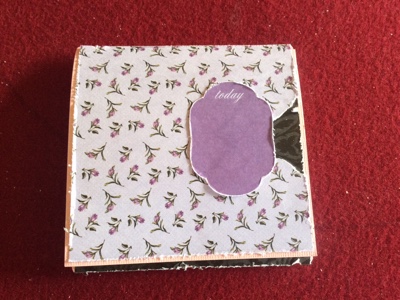
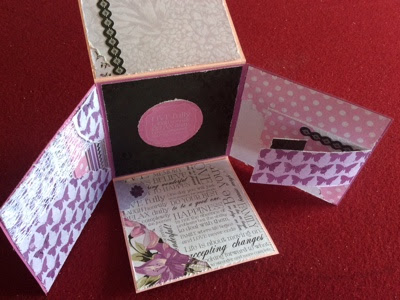
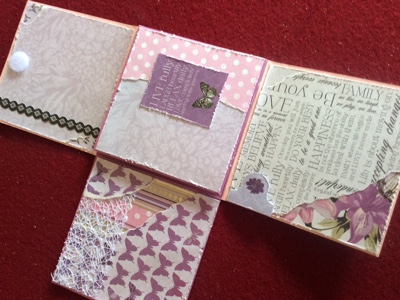
Interactive Super Card - Violet Crush


Trying to get back into the swing of things and so far I'm doing not to bad with my crafting.. I have been trying to use up some old stash of 6x6 paper pads.. Cause lets face it, don't we all have way too many of those suckers! lol..
 
Anyway, I found this awesome card fold on Pinterest, not sure what it's called (maybe
"Interactive Super Card" ??? This is what that poster called it..
Anyway, I love it.. So wanted to give it a go myself.. Of course, like normal I didn't go searching for a tutorial, I just winged it and figured it out from the photo..
 
 
This the inside of the card, standing..
 
 
I used the old Kaiser collection - Violet Crush..
 
 
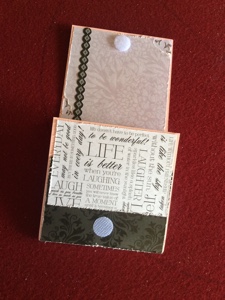
Securing the card shut with a Velco dot..  I couldn't see in the Pinterest one how they closed it, so just improvised with what I thought would be best.. I definitely needed something to keep it closer properly..
 
Here is the back side (flipped over) view of the card..
 
With scraps I was able to whip this little beauty up.. I was having a lot of fun with the layers..
What do you think?  Cards perfect for a teenage girl maybe?!?!?! :)


Thursday, January 28, 2016

Valentine's - Slider Card


Recently while Hunter and I were searching through Pinterest, he found a really fun Plane Slider Card..   We didn't have a plane, so we had a look at some of our favourite 3D stickers and found this lovely little love birds one.. Hunter adored it and picked it right away..
So with that picked, we got some cute Valentines paper (old 6x6 paper pad stash) and started making our card..

 
I actually really enjoyed making this card and with intend to make some bases so that when I make more in the future, it wont take anywhere neat as long.. I didn't use any tutorials for the measurements of the card, I like to work these things out for myself by just looking at templates..
 
Here is the card slid open..
 

To embellish the card, we picked out some flowers and used some glitter to make it pretty.. :)


Wednesday, January 27, 2016

Fairy Garden - January 2016

 This year I am creating a special Fairy Garden.. This area will be sort of a Calming / Zen place for me to just chill out at.. Hunter has been awesome at making sure we get the stuff done over the past couple of weeks.. lol

Energy Rocks / Mini Zen

First (with Lane's help) we layered some weed-proofing mesh down, then covered with potting mix to give a nice soft base for the fairy garden..
 
As part of my soul journey this year, it included a trip to a local store to pick up some Spirit / Energy rocks.. We used an old glass bowl, filled with clean & washed sand to create a Zen garden feel.. Surrounding and grounding it are some rocks from Hunter's "rock collection".. lol..


Fairy House Pot


Next was to crack out special Fairy house pot.. Hunter had the duty of doing this, he loved it!  Since the pot actually split in two halves, we relocated our operation to the Fairy Garden to glue and fill the pot..
 
Once we were out the front again, we picked the spot right in the middle for the pot.. Hunter was then tasked with opening the Fairies and deciding who was going to live in this house pot while I was filling it up..
 
We placed sand down and then filled the pot with soil and slid in the broken bits.. It has turned out pretty good actually.. :)
Special mention of the Fairy Dust so they can come alive, fly around and play together..
 
We have some Glow In The Dark stones that we placed to the sides of the bot so the Fairies can see at nigh time.. The fake grass at the front looks FAB and we can't wait for our big lot to arrive!
Hunter didn't want the blue Fairy to be lonely, so we put Tink out there too!
 
We made a special pool for our Fairies.. It has a sand base, then covered with blue pebbles and a glass tile on top.. There is also a small bridge on top of it at the moment (which will be getting moved in the future.. lol)  and a tiny little Street Light Lamp by the edge of the pool..
 
Hunter was having a blast playing with the Fairies.. lol..  He especially loves Tinkerbell   Twinkerbell.. We then added some extra sand and spread it around so we could place the cement Toadstools that my Mum got me for Christmas.. Their position may not be 100% finalised just yet.. Some may change when other Fairy houses and other products arrive throughout the year..
 
Here is a little Tree House ornament under one of the toadstools..
 
It was hard getting him out of the garden.. lol.. I finally succeeded by allowing him to play with my inside Fairies in my room..


DINOSAURS

 
Yes, we are having a Dino section in our Fairy Garden.. :)

 
This is only the beginning, as we collect more things for the Dinosaur exhibit we will be able to add more of the Dinosaurs to the garden.. Hunter and I have some big plans for this area too!!
 
We were very careful not to place the Herbivores too close to the Carnivores.. hehe..


Tuesday, January 26, 2016

Joy Fold Cards

 
For a fun technique challenge this month in one of the card groups I'm in, the theme was to create a JOY FOLD card..
This just so happens to one of my favourite folds, so as I was making one, I got onto a roll and ended up making 6.. lol..
There are 3 sets of 2 cards per paper collection..
 
 
This is the card that I was making originally.. The base although hard to see, has some clear Impasto paste and glitter on it with some glitter..
 
 
This is the first card and it's pair..

 
Now a fun pair for pre/teen boys..

And the 3rd pair for a little one who loves Farm animals.. :)

 
Not the clearest photo, but here are all the cards together..
Thanks for dropping by today..


Monday, January 25, 2016

Christmas Cards - Teacher gifts - High School

Finally today I am bringing with you a couple of cards that we gave to Lane's teachers.. I keep forgetting to post them up to share..

 
The left of the card has a slider box for the chocolates to be lifted out from the top..
The paper range is of course my new favourite Christmas collection, Silver Bells by Kaiser..
 
Lane's Math teacher told him that apparently he hadn't received a card in a VERY LONG time from a student, so Lane was quite pleased and proud of himself.. He chose to only give two cards this year although he has many teachers.. He chose his form group teacher and Math teacher, both of whim he quite likes.. He will be starting Grade 8 in just a few more days..

Thursday, January 21, 2016

250+ cards donated to local Nursing Homes


250+

 
Earlier this month I sorted through all the craft box that I have had stashed in a wardrobe..
90% of these cards have been collected from swaps that I participated in.. I managed to put aside over 250 cards that we have now donated very excitingly given to two of the local Nursing Home Villages.. I was just so grateful that they were happy to receive the parcel.. The cards are stunning and I'm sure the residents are going to love having a look through them and using to forward to their own friends and family..


2016 - year of positive vibes and thinking! And I can honestly say this felt GREAT to do!! :)

Wednesday, January 20, 2016

Cards- Acetate & Words Words Words

Acetate It

 
I really enjoyed making this card... As a special little extra for my swap partner, I put together this little circle card with the off cuts.. :) 


Words, Words, Words


This swap card required WORDS to be used.. So I used plenty! lol.. 
There is a fold on the front with a stamped sentiment, then under the flap is another and the tag behind it has the 3rd one.. I chose not to add anything like "happy birthday / thank you" as I wanted to give the option of the receiver to pass the card forward if they wanted to.. 


There are plenty of layers on this card.. First with a white base, with pink inked edges.. 
Then on top of that is Orange cardstock, Blue pattern paper, dotty pattern paper.. 
The toppers are a tag, then a strip of orange on the bottom and the fold on top of that.. 
Embellished very lightly with some fussy cut butterflies and twine.. 


Monday, January 18, 2016

Quick cards

Here are some quick cards that I thought I'd share with you today..

The whole set took me less than 20min TOTAL to put together!
(from the moment I sat at my craft desk, made the cards, tidied up and took the photo)

They were all made with a specific theme required..


Embossed


White Space


White plus One


Sunday, January 17, 2016

Scrapping Everyday Miracles - January

 
Good evening scrappers.. Tonight I'm back with a lovely Beachy layout featuring Hunter and a nice card to match..
 
This month at the Scrapping Everyday Miracles challenge blog they have their 3 challenge themes.. Layout Sketch, Card Sketch & Bible Verse.. I chose to use the two sketches, as we all know how much I love a good sketch!! :)
 
Beach Boy


I started off with an off white cardstock for the base.. Then spread some white gesso around and let it dry.. Put a multi stencil over it and covered with clear impasto, but I sprayed with several different types of Mist.. Off I pulled it off I dabbed all the colour with a tissue to soften it.. Finally I respread some gesso again.. In real life this gives the base a great texturing layer effect..
 
 
The cluster I have used is actually made up of entirely single flowers!! So there are 12 flowers, 1 clay thong, 4 shells, 4 leaves, bling swirl and the die-cut sticker that matches the paper collection..
 
 
I added some extras to the sketch to make it suit my own purpose more.. This circle is to hide a shadow in that corner of the photo, and the sentiment strip is to all some sort of visible wording to the layout.. There is space for a Journal tag under the circle..
 
 
Friendship
 
Since I have kept to matching and using the same collection papers for the last few times I've entered creations onto the SEM blog, I figured I'd continue on.. Plus these papers who awesome with the sketch and it's a great way to use up the scrap I've not got left over from the layout!! :)


So to keep it tying with the layout I used the same background paper (see the far strip on the left side of the layout).. The same flowers, shells and hand scribbled lines on boarder.. To bring in the red from the layout, I actually scribbled a little bit on the pickets outline..
 
Righto, that's it from me tonight, thank you for allowing me to share my layout and card with you.. I hope you've found some sort of enjoyment or inspiration from them! I would love to see your own creation linked up to the SEM blog too!! Until next time, happy scrapping.. Toni.. xoxo