Monday, September 28, 2015

Bag in a Box

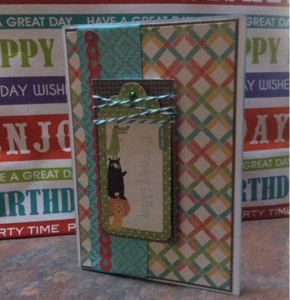
Hunter was sooooo super excited to be surprised with his very own Marvel Superheros 12x12 paper pad, that he wanted to make something immediately!! :) 

I have been seeing these Bag in a Box projects for a couple of weeks, but they seemed so tricky and time consuming so I have put off trying one... But the other day with an awesome inspiration post by fellow Memory Maze DT member Jodie, I finally decided to search around for a tutorial.. I found THIS VIDEO via Pinterest..  


The bag is unbelievably EASY!!! Amazingly simple that absolutely ANYONE would be able to give this ago!! Yep, even a 5yr old Hunter! :) 


I wasn't able to find a written tutorial, so have included some with photos below for anyone that wishes to have a go themselves too.. 

1. Start off with the base - 2 & 1/2 inches x 5 & 1/4 inches
Score 1/2 inch on all four sides.. Now place a small bit of tape on the corners, and cut one slice on the outside for each corner.. The corners will be folded on the OUTSIDE, not the inside of the box.. 


2- the side of the bag will be any size x 12 inches.. Depending on what size cards you intent to out inside it, will depend how high the bag will be.. This one is 5 & 1/2 inches x 12 inches.. (To fit 6 inch x 4 inch cards) 
The Marvel bag is 3 & 1/2 inches x 12 inches.. (to fit 4 x 4 cards) 
Place double sided tape down on the INSIDE of the bag, on the bottom and far right side.. 


3- take off tale and with the newly made box, start from about half way along one side and ROLL the box along the paper.. DO NOT CREASE at the corners as you go along, you're making a bag so it needs to be nice and smooth.


4- using 1/2 inch strips of matching cardstock, run them along the bottom and top of the bag.. 


5- cut another 12 inch strip.. This bag was 1/2 inch x 12 inch.. The Marvel bag was just under 1/2 inch wide.. Using a poker tool, punch a hole from the front of the bag into the inside so you can attach the handles and push a brad through.. Make sure the brad is split on the inside of the bag, as you use another 1/2 inch x 12 inch strip along the top inside of the bag also.. 


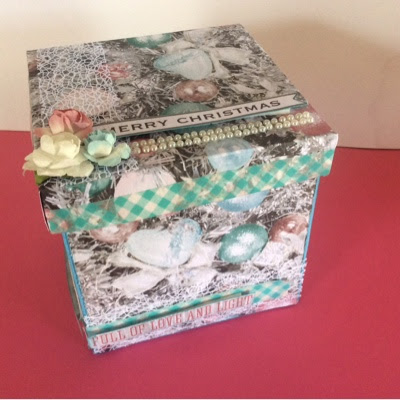
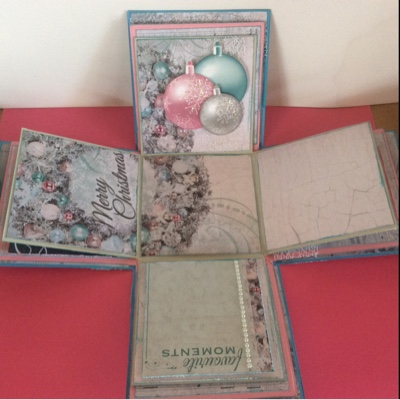
BAG IN A BOX IS NOW FINISHED!! You can either leave as is or decorate as your heart desires.. 

You can see that we have made some cards to match for the Marvel bag, however the cards for the other bag I can not show you just yet, as they are special one's made by my boys for their Grandma for her upcoming birthday..


I would love for you to drop by my Facebook crafting page at sometime..  

Finally, a big thank you to ladies that I mentioned at the start of this post for their inspiring projects.. 
I hope you've enjoyed these creations.. Until next time, have fun scrapping.. Toni.. xoxo


Wednesday, September 23, 2015

Christmas Exploding Box for swap


I am so excited to share this little box of Christmas Joy.. Ok, so I'm lead to believe that we are now on the count down to the holiday season with the kids on their Term 3/4 holidays, there is less than 100 days left until the big man Santa comes to town.. 
So to get people in a the right mood (I think it's more like- "well when we still actually have time to do this before everyone gets too busy and can't join in") an Aussie facebook sharing group are hosting a special Christmas themed swap.. One is to make an Ornament or the second option is to make an Exploding Box and include an Ornament.. I'm not great at making Ornaments, so of course I chose the second option of making the box so I can just buy an Ornament.. lol.. 


Anyway, this is what I came up with.. The partners have not been assigned yet, so I'm unsure of who the reciptant will be, but I truly hope they will like it! I have such fun putting it together.. 


I have purposely not included too many embellishments and extras with this box as I really just don't know how my swap partner will use it.. I have left some pages blank with only pattern paper, so if they wish to turn it into a memory box with photos they can.. There is also some journaling opportunities in there too.. 

The papers are the new Kaiser "Silver Bells" collection.. I used most of the papers and some of their diecuts.. 
Add some flowers, bling, kindy glityz, ribbon and washi and it's all set..


I'm not always able to keep my blog as up to date as I would like to, but if you can head over to my facebook crafting page and LIKE it to keep up to date in real time of my crafting.. Feel free to leave me some feedback too if you wish.. Thanks, Toni.. 


Monday, September 21, 2015

Enclosed Photo box for Lane

Life is pretty amazing

Starting with the Memory Maze 12x12 plain sheets of Chipboad, I cut them into the panels for this project.. They are 1&half inches on the sides x 6 inches for the front and back.. The chipboard gives it alot more strength than just using cardstock.. I actually marked out some white cardstock with scoring lines and stuck the chippie panels to it.. Then forming the box, I glued it all together.. Added an extra panel on the bottom for the base.. BOX MADE! 


Now it's Lane's turn. After seeing Hunter's photo box, Lane was pretty keen on having one for himself. However since he is now 12yrs old, I thought a more teenage grungy style would suit a little better.
So I have used the Kaiser "Scrap Yard" collection..

I love using bits and pieces from the tool shed for teenage boy themed projects. As you can see, I raided the washer container mostly for this box..
The Skulls on the Washi tape really fit well too.. What do you think?

Instead of photos being attached to the box, I have used a mini accordion style pullout thing for him. It too features photos from the first half of this year, plenty of journaling and definitely room for another accordion set to fit, which can feature the special events from the last half of the year.

The special moments in this album so far for 2016 include: Lane starting high school, becoming the youngest ever swim school champ (his House Captains were very proud!). Lane made the Rocky district team for the 3rd yr in a row for Swimming (even with a broken thumb), then went on to capture the Club Swim Age Champ too.. Made the AFL Rocky District & Capricornia Rep Teams.. He has taken up and really enjoys distance running, competing in some 5km events. He came 2nd Boy in his first race.. And he has started up CrossFit sessions also..


Memory Maze products used; 


Sunday, September 20, 2015

Scrapping Everyday Miracles - September

Like the case has been this year, I stalk my favourite challenge blogs but never seem to get the chance to join in... Today however I had the opportunity to get some crafting done, so went straight for the fun and bubbly papers I picked up on Friday, that I think will fit the Scrapping Everyday Miracles  layout and card challenges perfectly this month.. :) 


Layout sketch

LAUGH


This layout is empty of photos at the moment, however it will feature a photo of Hunter and I having a giggle during some "selfies" before bedtime..   The photo will be cropped and cut down to fit onto the page.


Card

I then made a card using their sketch with the same "Cherry Blossom" collection from Kaiser.. 


I had so much fun making these creations and am so relieved to have finally been able to join in at least one the challenge blogs that I love so much.. Thanks for visiting, hope to see you back again soon.. Toni.. :) 


Acetate Exploding Photo box for Hunter

Crazy Kid


After having so much fun creating my first Acetate Exploding box, I knew I just had to make a boy themed one.. Hunter seemed to really like the first one, so thought it would be a nice idea to make this one especially for him.. 
 It features many photos of him from some special moments throughout the first half of this year.. I have done alot of journaling too, making it a very interactive box for him to proudly play with.. 


The background / the first layer of the box features his very first student award at school and his first "mini half time" game at the local AFL club.. Twice a year the little players get to show off their skills for a mini game during the half time break of the Seniors games.. 


The next layer showcases him receiving a special particiation trophy for his swimming.. All under 7s got a trophy for their efforts.. He is also showing off the cool as swim bag that his swim team win for the most points in the club challenges.. 
The photo of the right was taken at his first ANZAC day march.. 


Next is the final layer.. It features a photo of Hunter in the hospital ER from when he fell off the fort at school and cut the back of his head open.. It was quite a distressing incident, but he came out the otherside quite fine.. :) 
Then lastely is his very proud photo of showing off his beloved SIPAHH straws.. He LOVES these flavoured milk straws.. And is very excitingly now a part of their Sipahh Kids club.. 


The papers I have used are all from Coco Vanilla.. I absolutely love their collections and think it is absolutely wonderful to have another Aussie paper manufacturer! 

All of the chipboard have come from Memory Maze.. They have been painted and inked. One of the best things about Memory Maze, is that they package the chipboard so generously. So I get to use some of the chipboard on several different projects before I run out of that product.


Memory Maze products used; 


Cogs  


Friday, September 18, 2015

Birthday goodies for a friend

Recently a friend of mine celebrated ber 30th birthday with a truly lovely dinner at a local restaurant.
As her gift, I did up the favours and centerpieces for her..
The only requirements that I was given were LOTS OF CHOCOLATE and for PINK to be included in the colour scheme..   So I hope that I have done justice with these.. :) 


The Wine Glasses have Washi tape that match the Ferroro Rochers and some pink ribbon around the stem.. The top has the pink ribbon wrapped around it with a Thank You tag attached.. 
The glasses were a little more simple.. The Washi and ribbon were all wrapped around just above center of the glass.. 

The centerpiece is a small glass milk/water bottle.. I unattached the top lid thingy and wound a very long length of ribbon it.. It is filled with M&M's.. The base is very simply a Cake base and some gourmet chocolates..  


 I also made a special signature shadow box frame for all the guests to either write a message or just their name on.. 
Again, I stuck to the same ribbon as I used on the other projects..  
I used a silver piece of card making paper for the backing of the frame.. Then used a Heart punch and some glue.. Because it is a shadow box, the edges of the hearts can be raised for a 3D effect.. 


I would love for you to drop by my Facebook Crafting page some time.. I try to keep it updated in real time as much as possible.. No buying, just for inspirational ideas and projects.. 


Wednesday, September 16, 2015

Fairy Acetate Exploding Box

I'm here today to share with you a project inspired by a fantastic creation I found via Pinterest..  -- https://www.pinterest.com/pin/288652657345273814/   It is a stunning Acetate Exploding box with a Christmas theme.. 

Well as soon as I saw it, I knew I wanted to have a go!! I'm not quite into the Christmas themed projects just yet myself (soon though I'm sure). So I decided to make this creation FOR ME! I pulled out my Fairy papers and had a blast! 


The papers are from an old Kaiser collection.. (I know there is a brand spanking new Fairy collection coming out in a couple of weeks from Kaiser, I'm so ridiculously excited!!!!! lol..) 

Anyway, I went into my room and looked through my own collection of hundreds of Fairies to find just the right one to fit and suit this box.. I love this September Fairy (my birthday is mid-September) and it works perfectly for this project.. 


Unlike normal Exploding boxes, I have not layered the outer panels.. Instead the sides are only single sheeted..  Due to the Acetate being clear, I'm able to position the Fairy and to create a little background for her to sit in front of.. 
This was my very first Exploding box style card that I had made and I had so much fun with it!! I have since made a special one for Hunter that will be a part of my upcoming Memory Maze DT post release.. So make sure you check back for that! :) 


8


I would love for you to join me over on my facebook crafting page..
It is definitely the best place to keep updated with my creations, mostly in real time..


Tuesday, September 15, 2015

Easy "walk out the door" child card

Recently my ready-to-go stash seems to have demenished.. So therefore I am finding mysely having to quickly create a card when I'm about to "walk out the door" to the event.. 

This one is a cute little one that was made up for one of Hunter's friends birthday.. 


Just remember that simple cards are always appreciated just as much as over the top or overly done cards... There is no right or wrong with cards made especially for someone, so if you don't have the confidence or time, you DO still have the ability to make something easy and simple that the receiver will love.. :) 

I would love for you yo drop by my facebook crafting page when you have a chance.. I keep my creations updated on there in real time.. 
https://www.facebook.com/scrapcrazy.customcreations.  

Thanks, Toni.. 

Friday, September 4, 2015

Butterfly Dreams

So glad to have you back today folks.. As promised yesterday, I will be sharing with you the second layout of the "IT IS OK TO SCRAP YOURSELF" DT post using Memory Maze chipboard. 

Butterfly Dreams


This layout has just myself in the photo. 
The chipboard has been used in a completely different way now. This page features the chippie as the hero, is being surrounded by flowers, washi tape and some micro beads. 


Unfortunately the photo doesn't do it justice, but the chipboard is coloured by a Silver Alcohol ink. I love that stuff because I don't have to prep the chipboard with anything for it to shine it's true stunning colour. Such a shame it doesn't come through on the photo though. 


Memory Maze products used; 


Stencil - used to make silver leaves under the large flowers.


Thank you very much for dropping by, I hope you have found some inspiration to scrap yourself! 


Thursday, September 3, 2015

Timeless layout - Lane and myself

Hello scrapping friends... I'm here to tell you, IT IS OK TO SCRAP YOURSELF! 
So many of us today tend to forget about our own photos when crafting. We'll lean towards our children, partners, parents and even our pets without giving it a second thought. But when it comes to using our own photo we always seem to pass on it for some reason.  Well not any longer! 

Timeless with Lane


This layout includes a gorgeous photos of myself and my big boy Lane. Although it's not the most in focus photo, I still adore it! 
The chipboard pieces are being used along with the flowers and metal embellishments to create some clusters all over the page. All of the chipbpard pieces have been either inked or painted. The frames have been layered on the page after being cut from a 12x12 pattern paper sheet. 


Memory Maze products used; 


Come back tomorrow to see the second layout I made for my DT post.. 
Instead of the chipboard being the embellishment supporting pieces, it is the highlight and hero of the page.. :)